Jan 13, 2018
Well it’s been quite a while again since I last posted but I needed a place to stick this recipe and figured it was a good time to pick this back up. I cobbled together a few different simple recipes to find a combination my family likes a lot and is still super easy to make.
Ingredients:
- Skin on chicken legs (however many you need)
- Oil of choice (I used avocado spray)
- Salt
- Pepper
- Smoked Paprika
- Garlic Powder
- Dried Rosemary
Recipe:
- Preheat oven to 375 F
- Line a baking tray with tinfoil if you want easy cleanup (one with raised edges to hold in the grease)
- Lightly coat the tinfoil with the oil
- Rinse and pat dry the chicken and place skin side down on the tray
- Season the chicken to taste with salt, pepper, smoked paprika, garlic powder and rosemary
- Bake for 30 minutes
- Flip the chicken to skin side up
- Season the new side the same way
- Bake for 23 minutes
- Change to broil and cook another 7 minutes to give skin a nice crispy texture
Serve and enjoy!

Feb 18, 2014
I recently upgraded a cluster of ESXi 5.1 hosts to 5.5 and learned a lesson about using a NIC that requires a third party driver. All of my hosts are using Qlogic 10Gb CNA cards which requires a driver to be loaded (a custom vib). Unfortunately if you try to upgrade to 5.5 using Update manager it disables the third party drivers before actually doing the update. Since Update manager does the update over the network interface as soon as that driver is disabled the host loses contact with vCenter and Update manager and the upgrade hangs. Luckily nothing has actually been done yet and the host can simply be rebooted and it will come back up as though nothing has been changed. The solution is to always do the upgrade using the ISO (either as a physical DVD or USB flash drive or network mounted via a management card like an iLO on HP servers) so that there is no networking required during the upgrade. Once the upgrade is completed I was able to install the newer driver for ESXi 5.5 and a reboot later and my host was back in business.
So the lesson learned is be very careful if using third party drivers not part of the base ESXi image. It always seems to be safer to interact with the host directly rather than using vCenter for upgrades (never had an issue yet with patches though) if third party drivers are involved at all.
The next time I have to upgrade I think I may try to create a custom ISO with my third party drivers already integrated just to avoid the extra steps. If I do I’ll try to post about the process and how it went.

Jul 3, 2013
It’s been a while since I’ve added an entry on here and I’ll be adding a bunch soon. I’ve got a bunch of half written posts and some new recipes I just have to get the pictures the way I want. I’m still here and more should be coming soon!

Dec 9, 2012
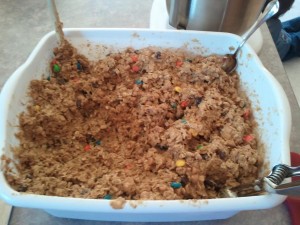
Just made our 2012 Christmas batch of Monster Cookies and thought I’d share.

Ingredients
- 12 Eggs (yes a full dozen)
- 2 lbs Brown Sugar
- 4 c White Sugar
- 1 Tbsp Vanilla
- 1 Tbsp White Karo Syrup
- 8 tsp Baking Soda
- 1 lb Butter Softened (yes a pound)
- 3 lb Peanut Butter
- 18 c Oats (Not quick oats)
- 5 bags various candies (I used M&Ms, Chocolate Chips, Peanut Butter Chips, Butterscotch Chips & Heath bits this time)
Tools
- If you have a mixer with detachable beaters I strongly recommend using one of them in a power drill to do the actual mixing as you can burn out a standard electric hand mixer with this recipe.
- Plastic dish tub (there is no bowl large enough!)
- A regular mixer to beat the eggs/sugar (or use the drill!)
- Large baking sheets (2) (one in the oven and one in prep so you can keep swapping as it takes a while to bake them all, I use 2 large air bake sheets that I can put 15-24 cookies on depending on how big I’m making them)
- Something to store them in when you are all done (I use gallon freezer bags usually and can fit 12-30 in a bag depending on size)
- A scoop or spoon
- Strong wooden spoon (or your hands!)
Directions
- Beat the dozen eggs until well blended (do not over beat)
- Add in the Brown and White Sugar and beat until well mixed
- Add in the Vanilla, Karo Syrup and Baking Soda and mix in
- At this point start using the power drill if you aren’t already otherwise a wooden spoon
- Add in the Butter and beat until fully mixed
- Add in the Peanut Butter and beat until fully mixed
- At this point you will need to use either a strong wooden spoon or your hands as not even the power drill will work
- Add in the Oats and mix thoroughly
- Add in the Candies and mix to get an even distribution throughout the batter
- Preheat the oven to 350F
- Spoon the batter onto an ungreased cookie sheet (you can make these a variety of sizes to try out different sizes, I used a Pampered Chef medium scoop with a squeeze handle for ease and I wanted them to be a consistent size)
- Bake for 10-15 minutes (varies by the pan type used and the size of the cookie so keep an eye on them until you figure out the time you need)
- Let the cookies cool on the sheet for at least 5 minutes before trying to move them off as they are very soft and fragile when fresh out of the oven
- I use a non stick spatula to remove them from the sheet, smaller cookies come of easier, larger ones you need to work from all sides to loosen it enough to come off cleanly
- I also use the spatula to scrape off any remains before I scoop new ones onto the sheet.
- Assuming you are using two cookie sheets there is time after you take a batch out to let it cool, move to a cooling rack or paper towel and then scoop on the next batch before the one in the oven is ready to take out. You should always have the next one ready to go in when you take one out or you end up baking all day!
This recipe will make anywhere from 12 to 25+ dozen cookies depending on how large you make them. Using the scoop I ended up with around 27 dozen 3″ cookies. Those are full size cookie sheets in the picture below (I didn’t bake on those, just used them as a final resting place before bagging) to get an idea of the size (that is about 200 of them in the picture).


Nov 29, 2012
We needed a recipe to try something new with Mahi Mahi we had in the freezer and wanted to try to use at least a few things from our recent CSA box as well. We had fresh ginger in our box (first year of ginger for our CSA!) and some beautiful tat soi heads and these two recipes sounded like they’d go well together. The Mahi Mahi recipe is compliments of everydaypaleo.com and the tat soi recipe is from our CSA newsletter (Andrea Yoder). My wife did the cooking tonight and both dishes turned out excellent and the flavor combination was perfect!
Tat Soi Salad with Lemon-Ginger Vinaigrette (By: Andrea Yoder)
Ingredients:
- 1 head of tat soi, greens & stems in bite sized pieces, washed and dried
- 1 medium carrot, finely shredded
- Lemon zest from 2 lemons
- 2 Tbsp lemon juice
- 1 Tbsp honey
- 1 Tbsp fresh ginger, minced or pressed with a garlic press
- 4 Tbsp olive oil
- Pinch of salt
- Freshly ground black pepper
- 1/4 cpu almonds, chopped & toasted
Recipe:
Prepare the vinaigrette by combining the lemon zest, lemon juice, honey and ginger in a bowl. Slowly drizzle in the oil and stir to combine. Best if made 15-20 minutes before server to allow flavors to mix.
Prepare the salad just before serving by placing the tat soi and shredded carrots in a bowl and mix. Top with pinch of salt and freshly ground black pepper. Add the vinaigrette and toss to combine. Don’t use too much vinaigrette, just enough to give a light coating. Top with toasted almonds.
Gingered Carrots with Mahi Mahi (double this recipe if feeding more than 2 or 3)
Ingredients:
- 4 carrots, sliced
- 3 tablespoons grass fed butter or coconut oil
- 5 green onions, diced
- ½ teaspoon fresh grated ginger
- 1 teaspoon crushed garlic
- 1 pound of mahi mahi pieces or other white fish of your choice
- 1 tablespoon fresh lemon juice
- ½ cup chicken broth
- 1 tablespoon coconut aminos or 1/2 teaspoon of wheat free tamari
- Fresh ground black pepper and sea salt to taste
Recipe:
- Saute the carrots in 2 tablespoons of the butter or coconut oil over medium heat for 5-7 minutes or until the carrots start to brown.
- While the carrots are cooking, mix the chicken broth, coconut aminos or tamari and black pepper together in a bowl and set aside.
- Add the green onions to the carrots and cook for another minute.
- Add the lemon juice, ginger, and garlic to the pan and sauté just until the veggies are coated with the ginger and garlic.
- Sprinkle with a little sea salt, stir again, and remove the carrot mixture from the pan and set aside.
- Add the remaining tablespoon of butter or coconut oil to the same pan and melt over medium heat.
- Add the fish pieces and cook for 1 minute on each side, making sure that your pan is nice and hot so that the fish sear and turn golden brown on each side.
- Now, pour the chicken broth mixture that you made earlier over the fish, cover and cook for another 1 – 2 minutes or until the fish is tender and flakes apart easily. Do not overcook!!
- Serve the fish over the gingered carrots


